This guide will help you through the early stages of ATM9 TTS.
Crook
To get started, you'll need to begin by punching wood to obtain logs. With the wood you've gathered, craft a
Crafting Table and then a Crook.
Re-grow your tree and use the Crook to harvest the leaves. It may take a few tries, but eventually, you'll
obtain one or two Silkworms.
Once you have Silkworms, re-grow another tree and right-click leaves with the Silkworms in hand. Wait
for the leaves to become fully infested (they'll turn white).
Once fully infested, harvest the leaves with your Crook — this will give you
String, which is essential for crafting the String Meshes required for
your Sieve.
To obtain Cobblestone, right-click grass with an empty hand to gather
Pebbles. Combine four Pebbles in a 2x2 crafting grid to create one Cobblestone block.
While this method can feel tedious early on, it's essential for progressing in the pack. I recommend
making a Dank as it will filter out the other pebbles.
Sieving
To begin gathering sievable materials, you'll first need a Hammer. Craft one by
combining two sticks and two cobblestones. Once crafted, place a cobblestone block on the ground and use
the hammer to break it down into Gravel. Gravel is your primary sieving material early
on. Right-click the sieve repeatedly to process the gravel and reveal items.
To improve your sieve's efficiency, upgrade to a Flint Mesh. Craft this by combining a
String Mesh with four pieces of flint. This upgrade increases your chances of obtaining valuable ore
chunks. Once you have enough resources, I highly recommend progressing to Iron Meshes
and eventually Golden Meshes. Golden Meshes significantly boost your odds of receiving
rare
drops like Diamonds and Emeralds when sieving Gravel.
Once you've established a basic power setup, you can automate this process using a Cobblestone
Generator, Flux Hammer, and Flux Sieve. This system
allows you to passively generate sieved resources while focusing on other parts of your base. For full
automation, you'll want to integrate a Tier 3 Crafter (RFTools Utility), a
Mechanical Squeezer for ore doubling, a Furnace (see below), and
upgraded storage such as a Gold Chest, or a Gold Barrel with item
collection.
Tip: I recommend upgrading your furnace early — a Gold Furnace or
Diamond Furnace will dramatically speed up your smelting rates and keep up with
automated input.
Generating Early Power
In the early stages of ATM9 To The Sky, setting up a basic power system is crucial for
beginning automation. Mekanism offers the Heat Generator, which runs
on lava and is easy to set up using your early crucible setup. Alternatively, RFTools
Power provides the Coal Generator, which uses burnable fuel like coal or
charcoal. Both are compact and effective starter options.
Once you've placed your generator, you can power nearby machines directly or use basic cables to
distribute energy more efficiently. Universal Cables (Mekanism) and Energy
Pipes (Pipez) are easy to craft and ideal for connecting machines like Flux
Hammers, Sieves, or even early Iron Furnaces.
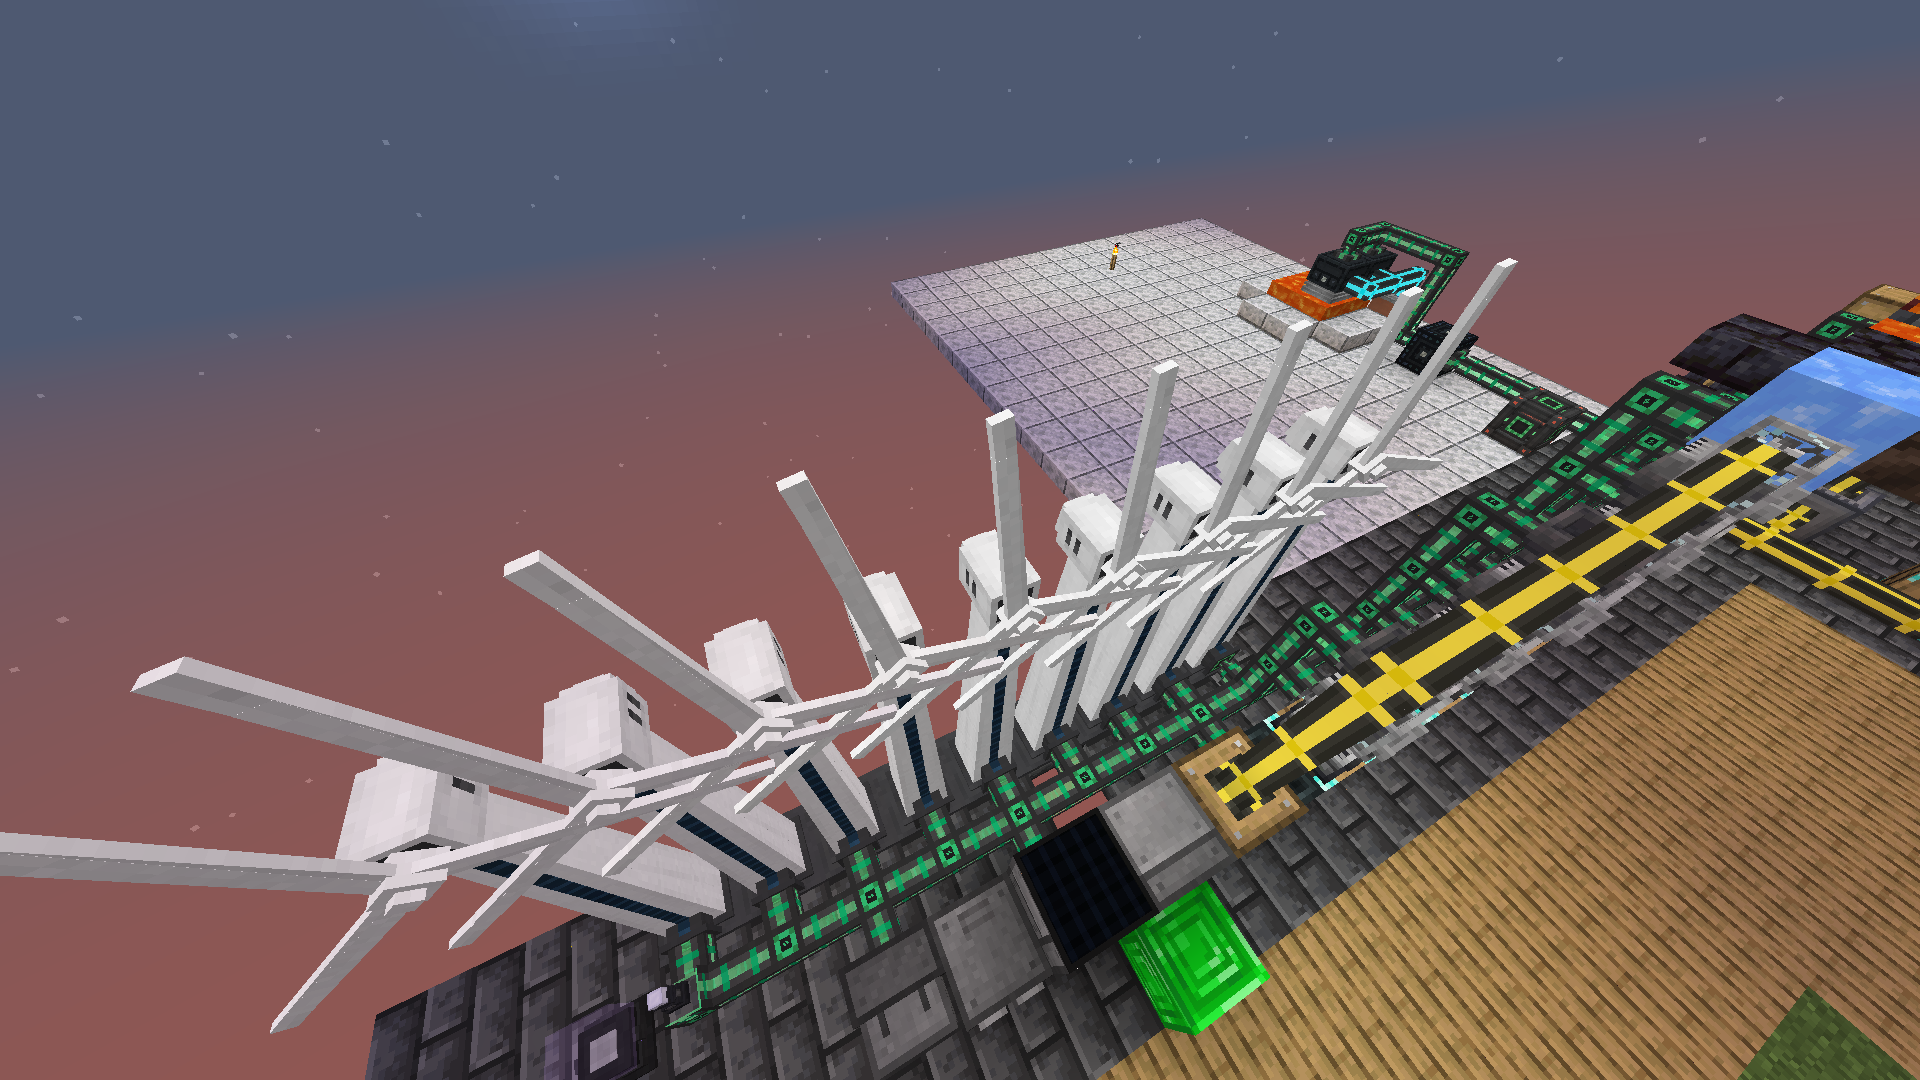
A strong upgrade from there is the Wind Generator from Mekanism. It provides a steady
and renewable energy source that performs best at higher altitudes (Y > 128 is ideal). Wind Generators
are a great long-term solution for powering multiple early automation blocks.
In the setup shown, nine Wind Generators are used to fully power a suite of machines —
including Flux Hammers, Flux Sieves, a Tier 3 Crafter
(RFTools Utility), a Mechanical Squeezer, and a Furnace with a
Factory Upgrade. However, for simple gravel sieving, even one Wind Generator is often
enough to get started.
To prevent power loss during automation, consider using two Thermo Generators from
Powah, each producing a stable power output. Connect both to an Ender
Cell, which acts as a remote energy storage and transfer system. From there, you can link
the Ender Cell to your power network using Basic Universal Cables (Mekanism) or
Energy Pipes (Pipez). This ensures that your machines remain powered even if one
generator goes offline or you expand your system later.
Creating a Cobblestone Generator
Craft a Cobblestone Generator (Tier 1) using six wooden logs, one bucket of water, one
bucket of lava, and a glass block. Once placed, it will passively generate cobblestone and automatically
insert it into an inventory placed directly on top. A Storage Drawer is ideal here — it
holds 2,048 cobblestone by default, and its capacity can be upgraded later with Storage
Upgrades.
To get water early, place an Oak Barrel outdoors and let it fill when it rains. Once it
rains,create an infinite water source by digging a 2x2 hole and filling opposite
corners with water. This ensures you always have access to a renewable water supply.
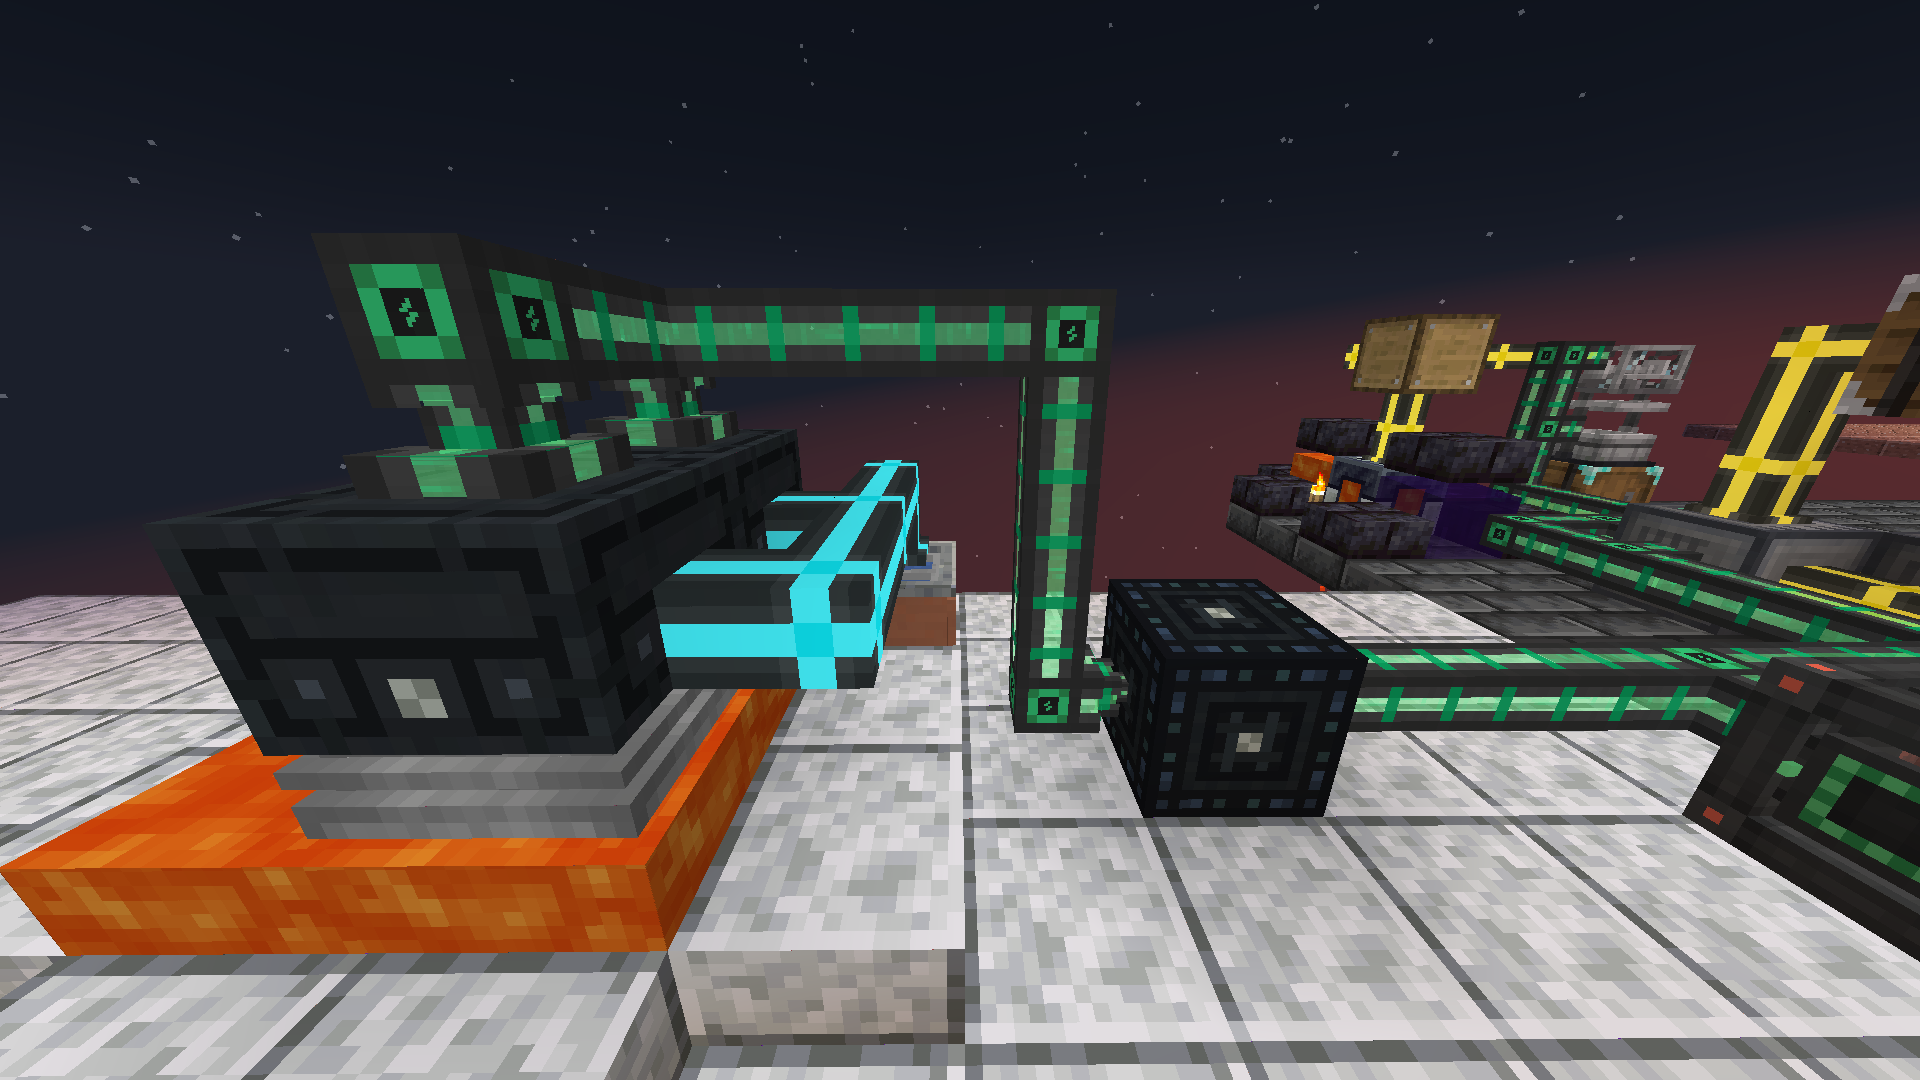
To produce lava, you'll need a Porcelain Crucible placed over a heat source — a torch
works, but using a Campfire or Magma Block will significantly speed up
the melting rate. Feed the crucible with cobblestone until it accumulates 1,000 mB of lava, then extract
it using a bucket. This lava is essential for crafting your cobble generator or powering early Heat
Generators from Mekanism.
Generating Resources
Early resource generation is built around Sieving and Mystical
Agriculture. Once you've gathered enough Inferium Essence from mob drops,
you can craft Inferium Seeds and plant them in regular farmland. These seeds passively
produce Inferium, which you'll use to progress through the mystical essence tiers.
To fully automate essence crafting, combine LaserIO (Laser Node + Item Cards),
Basic Item Collector, Storage Drawers or Barrels, Item
Pipes, and a Crafter Tier 3 from RFTools Utility. This
setup can automatically convert lower-tier essences into higher ones, eventually giving you access to
Supremium Essence and beyond.
A functional Mob Tower is key before entering mid-game. Many advanced recipes rely on
mob drops, especially for essence farming. Using Mob Grinding Utils, you can build a
reliable, compact system using Fans to push mobs and an Absorption
Hopper to collect drops and XP. You don't need Dreadful Dirt at this
stage.
To obtain Soul Sand early, drop Sand into a barrel of Witch
Water. To make Witch Water, you'll need Mycelium — acquired by sieving
dirt to find Mycelium Spores. Right-click a dirt block with spores to start the spread.
❗Tip: Mycelium spreads fast, so isolate it from your grass or dirt-based
farms.
Place an Oak Barrel on top of a Mycelium block, then fill it with water. Wait for the
water to transform into Witch Water, then right-click with sand to convert it into Soul Sand. Once
you've got your first block, you can automate this process using the Create mod.
For Create-based automation, set up a Water Wheel or other rotational source, connect
it to an Encased Fan facing a Depot, and place Soul
Fire (Soul Sand + Flint & Steel) between the fan and depot. Drop sand on the depot and let
the fan convert it into Soul Sand over time. This loop is entirely passive and great for scaling later
mystical farming or Nether Quartz generation.
Sievable Blocks
Xycraft's Extractor allows you to create valuable blocks like
Blackstone, Deepslate, End Stone,
Moss, and Mud. These blocks can be processed further to obtain unique
resources through sieving and hammering chains.
Most of these materials — like Blackstone and End Stone — can be piped directly into a Flux
Hammer to be crushed into their respective fragments, which are then sent into a
Flux Sieve for processing. Moss doesn't need to be hammered and can be
piped straight into a sieve.
Mud, however, requires a different approach. First, pipe the mud into a
Mechanical Squeezer (or standard Squeezer if you're doing it manually) to convert it
into Dirt. That dirt can then be sieved for various early-game items like seeds,
mycelium spores, and more.
For standard materials like Gravel, Sand, and Dust,
you can automate production using Cobble For Days generators. Pipe cobblestone into a
Flux Hammer to get gravel, then into a second hammer to get sand, and finally into a
third hammer to produce dust — each stage requiring its own Flux Hammer. From there, send the processed
material into the corresponding sieve.
You can also fully automate Soul Sand production using Create. Start
by hammering cobblestone down to sand, then pipe it onto a Create Depot. To the side of
the depot, place a block of Soul Fire (Soul Sand lit with Flint and Steel), and have a
Fan blow over it to convert the sand into Soul Sand. Once transformed, use a
Mechanical Belt or chute to carry the Soul Sand into a barrel or directly into a sieve.